A shaky ceiling fan is more than just annoying. It can be unsafe. Over time, the support above the fan can wear out. Metal bends. Screws loosen. The box starts to move. That is when a replacement becomes a smart move. Many homeowners also upgrade the support when adding a ceiling bracket for light fixtures so heavy lights stay secure. The good news is that this job is simple when done step by step.
Why the Brace Is The Real Hero
People often focus on the fan. But the brace does the heavy lifting.
A strong brace:
- Holds the fan steady
- Spreads the weight across the joists
- Stops wobbling and noise
It also protects the wiring inside the ceiling. That matters for safety.
The same idea applies to lighting. A solid mounting bracket for bathroom light fixtures keeps the fixture from sagging over time.
Signs Your Old Brace Is Ready to Retire
When Your Fan Starts Dancing
If the fan moves like it is at a party, something is wrong.
Look for these clues:
- Wobble that never goes away
- Clicking or creaking sounds
- Ceiling box that shifts when touched
- Rust on the metal brace
- Plastic box that was never fan rated
These signs mean it is time for a replacement.
Tools You Will Need
Get everything ready first. This saves time and stress.
Basic Tools
- Ladder
- Screwdrivers
- Drill
- Adjustable wrench
- Voltage tester
Materials
- Fan rated brace kit
- New metal electrical box
- Mounting screws
- Wire connectors
Many installers prefer the Ez Brace 101 ceiling fan support because it fits without attic access.
Safety Comes First Always
Electricity is not a guessing game.
Follow these steps:
- Turn off the breaker
- Test wires with a voltage tester
- Never trust only the wall switch
Once power is off:
- Remove the fan canopy
- Disconnect wires carefully
- Support the fan while removing screws
Set the fan aside safely.
Removing the Old Brace Without Making a Mess
Older braces can be stubborn. Some are nailed into place. Others expand between joists.
Work slowly:
- Remove the electrical box first
- Loosen any screws or bolts
- Collapse the brace if it is expandable
- Slide it out through the ceiling hole
Take your time. Rushing can damage drywall.
Picking the Right Replacement Brace
Not all braces are built the same.
Look for these features:
- Fan weight rating of at least 70 pounds
- Adjustable length for joist spacing
- Strong metal body
- Locking teeth that grip wood
The Ez Brace 101 fan bracket is made for retrofit jobs. It locks tight between joists from below.
Step by Step Installation
Step 1 Slide the Brace In
Insert the brace through the ceiling opening. Position it between the joists.
Step 2 Expand and Lock It
Twist the brace until both ends grip the wood. Make sure it sits level.
Step 3 Attach the Electrical Box
Bolt the fan rated box to the brace. Tighten the bolts firmly.
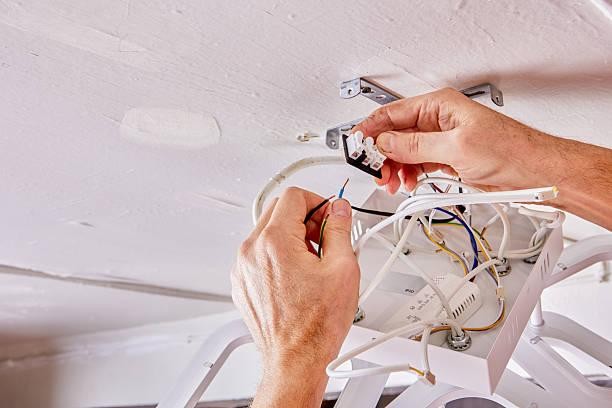
Step 4 Reconnect the Wires
Match the colors:
- Black to black
- White to white
- Ground to green or bare wire
Use fresh connectors.
Step 5 Mount the Fan
Attach the fan bracket to the new box. Lift the fan and secure it. Restore power and test.
Brace Types Made Simple
| Nail on brace | Yes | Light to medium | Light fixtures |
| Expandable brace | No | Medium | Fans and lights |
| Modern fan brace | No | High | Heavy fans and fixtures |
Modern braces are the easiest to install and the safest for moving fans.
Mistakes That Can Cause Trouble
Skipping the Breaker Step
Never work on live wires. Always shut off power.
Using a Light Rated Box for a Fan
Light boxes are not built for movement. Fans need fan rated support.
Over tightening Screws
Too much force can crack the box. Tighten just enough.
Poor Joist Contact
Both ends of the brace must touch solid wood. No gaps allowed.
When Replacement Is the Smart Choice
Repair is not always enough.
Replace the brace if:
- The box is plastic
- Metal is bent or rusted
- Fan is heavier than the old rating
- Drywall around the box is cracking
A new brace gives long term peace of mind.
Pro Tips From Years On The Ladder
Seasoned electricians keep things simple and smart. Always measure joist spacing before buying a brace. Guessing leads to return trips and wasted time. Keep extra wire connectors in your pocket. Dropping one from the ladder happens more than you think. A magnetic screwdriver is a lifesaver for overhead screws. It stops the “butterfingers” moment. After installation, run the fan at low, medium, and high speeds. Listen for clicks and watch for wobble. These small habits prevent big problems later and make every install cleaner, faster, and safer.
Extra Uses for a Fan Rated Brace
A fan brace is not just for fans.
It also works for:
- Heavy chandeliers
- Pendant lights
- Garage lighting
- Bathroom fixtures
That makes it a smart upgrade for many rooms.
Quick Safety Checklist
Before finishing the job, check:
- Brace locked tightly to both joists
- Box secured with bolts
- Wires connected correctly
- Fan mounted firmly
- No ceiling movement during operation
If all looks good, the job is done right.
Ready For A Stronger And Safer Setup
A solid brace keeps fans quiet and steady. It also protects wiring and drywall. Replacing an old support is a smart weekend project. It prepares the ceiling for upgrades and heavier fixtures. A dependable ceiling bracket for light fixtures adds extra strength where it matters most. For reliable hardware and proven support solutions, the professional grade options from Fixture Support Systems are worth exploring.
FAQs
Q. Can a fan hang from a regular ceiling box
No. Only a fan rated brace and box can handle fan movement safely.
Q. How much weight can a modern brace hold
Most hold between 70 and 150 pounds depending on the model.
Q. Do I need attic access for this job
No. Retrofit braces install from below through the ceiling hole.
Q. Why does my fan still wobble after replacement
Check blade balance and mounting screws. The brace may not be the issue.
Q. Can the same brace hold heavy lights
Yes. A fan rated brace also supports heavy lighting fixtures.