At Fixture Support Systems, we know that installing a light or fan should be simple, safe, and stress-free. Yet many homeowners are unknowingly putting themselves at risk by using non-compliant products like the “bar box,” which, frankly, is a danger. It was mistakenly approved for use in 120-volt installations, but our own testing shows it should never have passed. That’s why we designed the EZ Brace bracket—the only approved method for mounting a ceiling fan or heavy fixture safely. In this guide, we’ll walk you through how to properly install a mounting bracket for light so you can feel confident in your DIY project.
Safety Comes First
Electricity isn’t something to mess around with. Using the wrong hardware increases the risk of accidents, loose fixtures, or even fires. The good news? With the right support system, you can avoid danger and enjoy your new light or fan for years. That’s where Fixture Support Systems steps in. We make safety straightforward with reliable products like the ceiling fan mount box, specifically engineered to outperform outdated and unsafe options.
Prep Your Space Before You Jump In
Before you start, gather your tools: screwdriver, voltage tester, wire stripper, and of course, the right support hardware. Always switch off power at the breaker box to stay safe. Once that’s done, remove the old fixture and carefully examine the wiring. If you’re replacing a bar box, this is the moment to get rid of it. Trust us, it’s not worth the risk. Instead, upgrade to an EZ Bracket 101 that locks firmly into place and keeps your installation compliant.
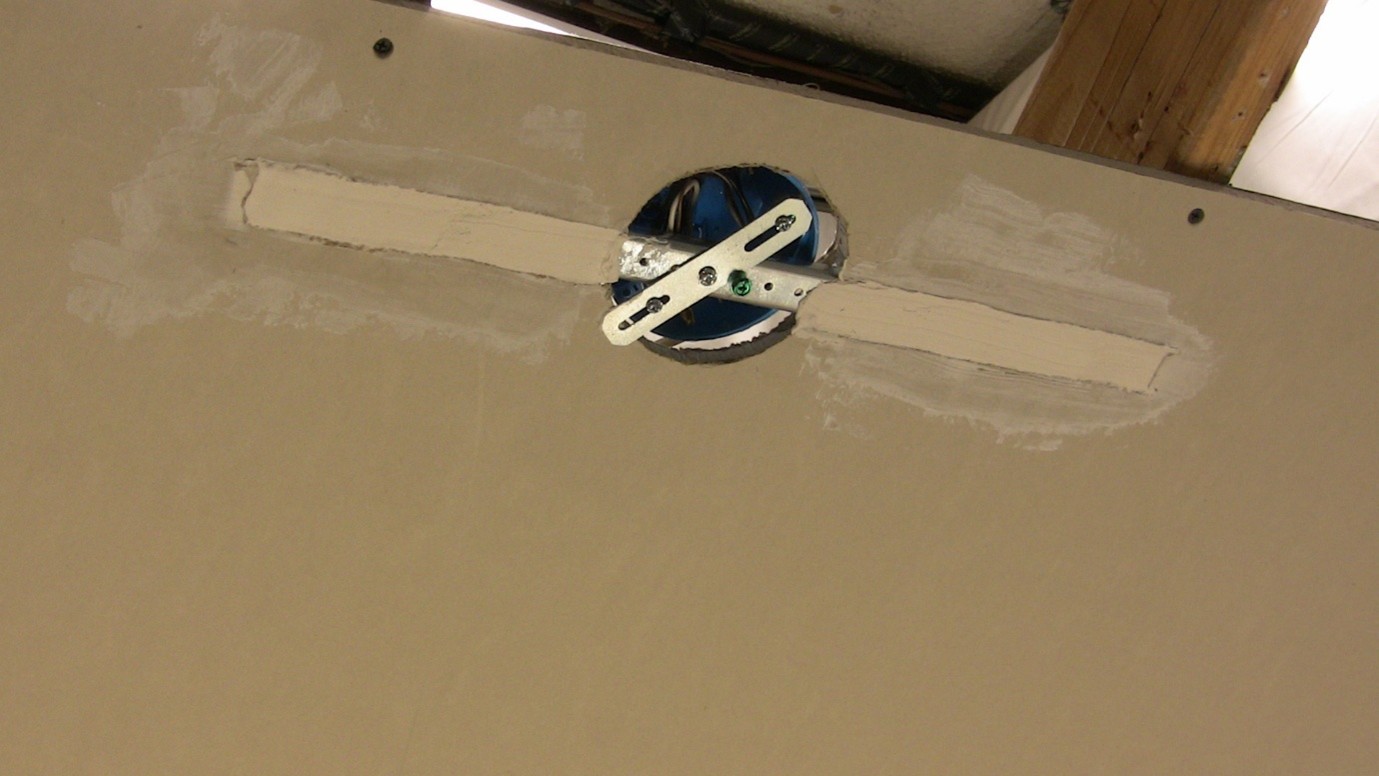
Secure the Right Bracket the Right Way
Now comes the fun part. Position the mounting bracket for light securely over the junction box. Check that it aligns properly with the electrical box screws. Tighten it so there’s no wobble—stability is key here. This small detail makes a big difference in long-term safety and performance.
Make the Connections Neat and Tight
Once your bracket is solid, attach the fixture wires to the home wires: black to black, white to white, and ground to ground. Use wire connectors and double-check everything. After that, mount your fixture to the mounting bracket for light fixture and tighten the screws. The last thing you want is a sagging or shifting light when you flip the switch.
Outdoor? No Problem!
If you’re setting up outside, you’ll need the right weatherproof hardware. Using mounting brackets for outdoor lights ensures that your fixture can withstand moisture, wind, and other elements. Don’t cut corners here—outdoor environments demand tough support.
Test and Enjoy Your Work
Turn the power back on and test your new installation. A properly installed fixture should sit flush, feel stable, and light up instantly. If you’ve followed each step, your mounting brackets for light fixtures will keep everything safe and secure for years to come.
Pro Tips for DIY Success
- Always use approved products like the EZ Brace bracket to avoid unsafe situations.
- Never trust the old bar box—it’s non-compliant and dangerous.
- Keep your workspace clean to avoid confusion while wiring.
- When in doubt, call a professional. Electricity isn’t forgiving.
Frequently Asked Questions
1. Can I install a light bracket myself?
Yes, with proper tools and safety precautions, most homeowners can handle it.
2. Why is the bar box unsafe?
It wasn’t designed for today’s 120-volt standard house voltage, making it a serious hazard.
3. What’s the difference between EZ Bracket 101 and others?
The EZ Bracket 101 is fully compliant, safer, and easier to install compared to outdated products.
4. Do I need a special bracket for outdoor lights?
Yes, mounting brackets for outdoor lights are built to resist moisture and weather damage.
5. Can one bracket support both a fan and a light?
Yes, but only if you use a tested product like the ceiling fan mount box from Fixture Support Systems.
Ready to upgrade your home lighting or fan installation? Contact us today at fixturesuppsystems@yahoo.com and get the right support from the start.